
Can You Drill Into Vinyl Siding? A Guide to Drilling Without Damage
Whether you’re installing a security camera, hanging house numbers, or mounting outdoor decorations, you may wonder: can you drill into vinyl siding without cracking it or creating water leaks?
The answer is yes. Drilling into vinyl siding is possible when you use the right tools, allow room for temperature-related movement, and secure attachments to proper structural support. However, an incorrectly placed screw can damage the panel or expose the wall underneath to moisture.
At Builders Service Company, we’ve helped Washington homeowners protect and improve their home exteriors since 1974. Here’s what you should know before making that first hole.
What Should You Know Before Drilling?
- Vinyl siding can be drilled carefully without damaging the surrounding panel.
- Use a sharp drill bit, low speed, and gentle pressure to avoid cracking.
- Allow approximately 1/4 inch of additional hole diameter around fasteners for fixtures mounted through the panels, following manufacturer guidance.
- Attach fixtures to suitable framing or structural backing, not the siding alone.
- Protect penetrations through the wall’s water-resistant barrier to prevent moisture damage.
- Consider no-drill mounting options for lightweight decorations and temporary accessories.
Is It Safe to Drill Into Vinyl Siding?
Yes, you can safely drill into vinyl siding when the installation accounts for the material’s movement and the structure underneath.
Unlike wood, vinyl expands during warmer weather and contracts when temperatures fall. If a screw holds a siding panel too tightly, the material cannot move naturally. This can cause buckling, distortion, or cracking.
According to the Polymeric Exterior Products Association’s installation guidance, fasteners must not restrict the normal expansion and contraction of siding panels.
This is particularly important for Washington homes, where seasonal temperature changes and frequent rainfall can put exterior installations to the test.
The other concern is structural support. Vinyl siding is an exterior covering, not a load-bearing surface. A fixture may initially appear secure when attached only to a siding piece, but that connection can loosen or damage the material over time.
What Can You Attach to Vinyl Siding?
Different projects require different mounting methods. Before drilling, consider the object’s weight, exposure to wind, and whether the installation is temporary or permanent.
| Item | Recommended Approach |
|---|---|
| Lightweight decorations | Removable siding hooks |
| House numbers | Suitable mounting hardware with secure backing |
| Exterior shutters | Fasteners anchored into the supporting wall, with expansion clearance |
| Security cameras | Weather-resistant mounting block secured to appropriate backing |
| Exterior lights | Listed electrical mounting box and proper weatherproof installation |
| Heavy shelves or equipment | Engineered structural attachment, not siding alone |
A lightweight decoration may not require drilling at all. For heavier fixtures, the mounting system must transfer the load to framing or another approved supporting surface.
Never assume that tightening a larger screw will provide sufficient support.
How to Drill Into Vinyl Siding Without Cracking It
A clean installation begins with preparation. These steps apply to appropriate nonstructural attachments where drilling through the panel is permitted by the siding and fixture manufacturers.
1. Check the Location Before Drilling
Identify where the fixture will sit and inspect the area for cracks, loose panels, or previous repairs.
Avoid drilling directly through a siding seam, fastening slot, or overlapping edge unless the installation instructions specifically require it.
Also determine what lies behind the wall. Electrical wiring, plumbing, and other concealed components can be damaged by drilling. Do not proceed if their locations are uncertain.
2. Gather the Right Tools
For a typical small attachment, you may need:
- A variable-speed drill and sharp drill bit
- Measuring tape and pencil
- Safety glasses
- Suitable corrosion-resistant fasteners
- A compatible mounting block or spacer
- Manufacturer-approved flashing or sealant materials
Choose the bit and fasteners according to the fixture manufacturer’s instructions and the supporting wall material.
3. Mark the Attachment Points
Measure carefully before making holes. Check that the fixture is level and that every attachment point reaches suitable backing.
For larger fixtures, mark the positions using the mounting bracket rather than measuring each screw location separately.
This reduces unnecessary holes and helps maintain proper alignment.
4. Use Gentle, Controlled Pressure
Set the drill to a low speed and hold it perpendicular to the panel.
Apply light, steady pressure without forcing the bit. Allow the cutting edge to work through the material gradually.
Cold weather can make vinyl less forgiving. If the panel is especially cold or brittle, postpone the project rather than applying excessive force or high heat.
5. Leave Room for Expansion
For specialty attachments such as shutters and downspout brackets, the industry’s exterior attachment instructions recommend making the clearance hole through the siding at least 1/4 inch larger than the fastener’s shank diameter.
This clearance allows the panel to expand and contract around the stationary fastener.
Use the proper mounting block or spacer so the fixture remains secure without clamping the panel tightly.
Important Tip: A tight screw can restrict movement and cause siding to buckle as temperatures change.
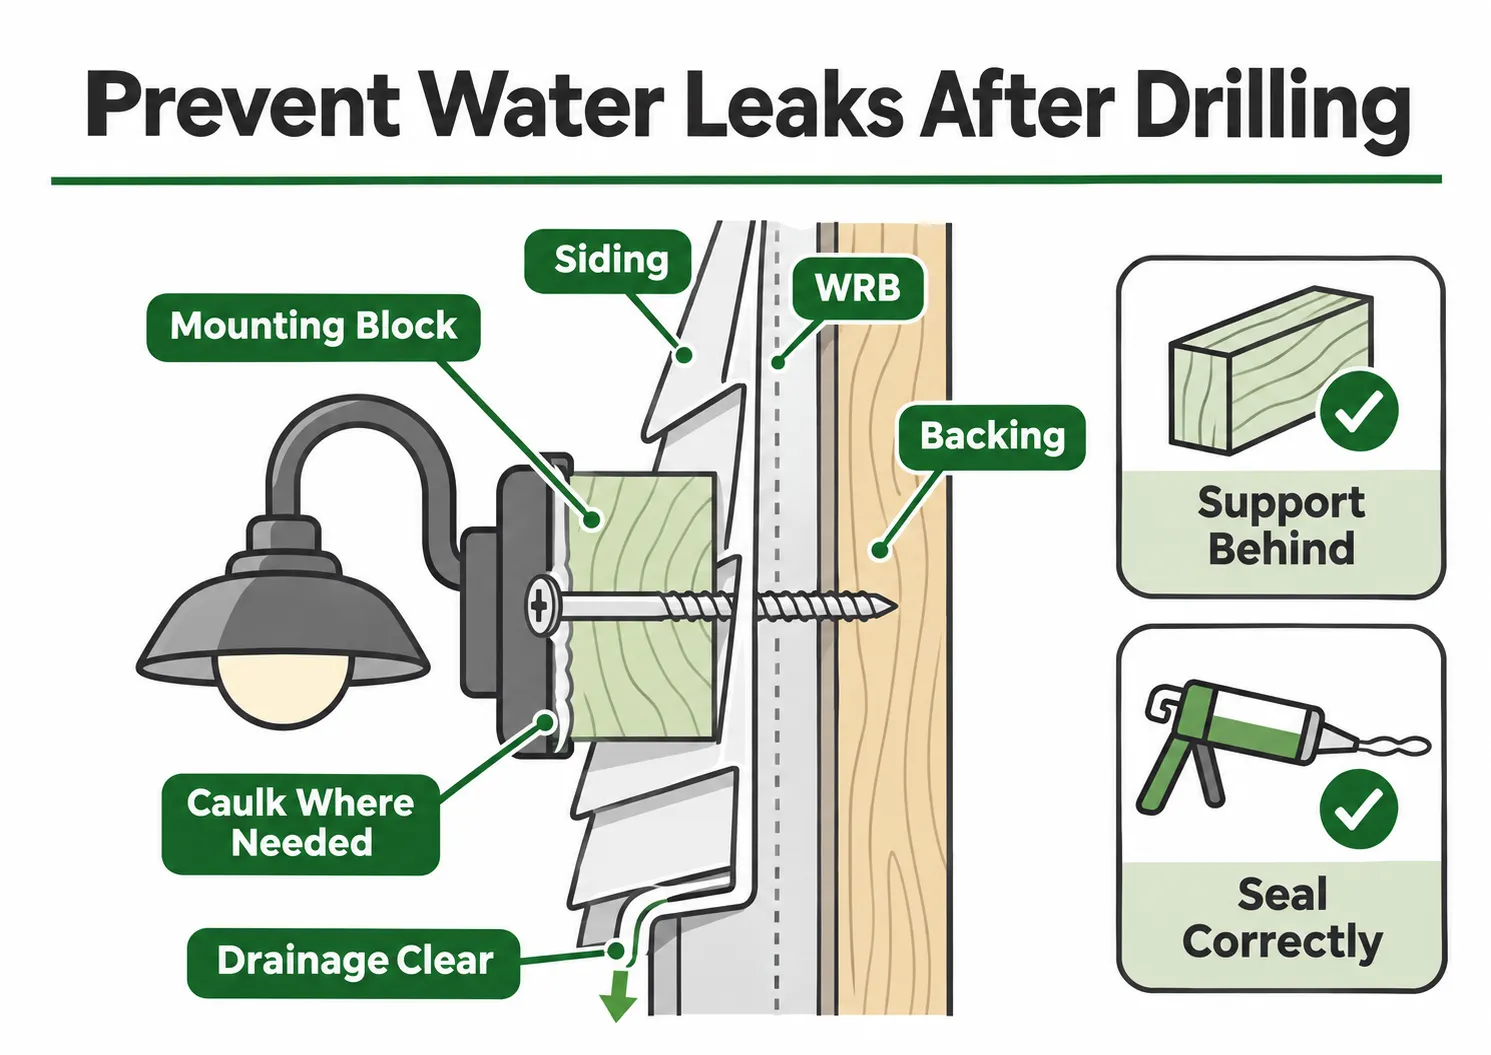
How Do You Prevent Water Leaks After Drilling?
Preventing moisture intrusion is just as important as avoiding cracks.
Vinyl siding sheds rain, but it is not the wall’s complete waterproofing system. A water-resistant barrier behind the panels helps protect the structure.
The U.S. Department of Energy’s building-science guidance explains how this drainage layer works with properly integrated flashing to direct water away from wall cavities.
For a secure installation:
- Use a mounting block or fixture designed for exterior siding applications.
- Protect any penetration through the water-resistant barrier according to the approved installation method.
- Apply compatible exterior-grade caulk only where specified around the mounting assembly.
- Keep factory drainage openings and siding seams clear.
- Inspect the completed attachment for gaps or damaged material.
Never rely on a bead of caulk alone to correct an improperly installed fixture.
For larger openings, the industry’s guidance on fitting siding around fixtures also recommends appropriate trim rings and allowances for movement.
Warning: Sealing every gap can trap moisture. Proper siding installations need controlled drainage as well as weather protection.
Can You Drill Into Vinyl Siding in Cold Weather?
Yes, but colder temperatures increase the importance of careful handling.
During a Washington winter, the material may become more vulnerable to cracking under sudden pressure. An older or already damaged panel deserves particular attention.
Avoid forcing the bit, striking the panel, or using a heat gun that could warp its surface.
If the project is not urgent, choose a milder day. For damaged or brittle siding, professional assessment is usually the safer option.
What Should You Do With an Existing Drill Hole?
An abandoned mounting hole should never be ignored, especially on a wall exposed to wind-driven rain.
The appropriate repair depends on the opening’s size, its location, and whether the underlying moisture barrier was penetrated.
Small openings may be repairable using a compatible siding repair method. Larger holes, cracks, or damaged panel edges may require replacing the affected section.
Poking holes in the siding repeatedly or simply covering a large opening with caulk does not provide a reliable long-term solution.
When Is Professional Siding Work the Better Choice?
Sometimes the problem is more than mounting a single fixture.
If several siding panels are cracked, the wall feels soft, or water has entered around previous attachments, the underlying structure may need attention.
This is particularly important around windows, doors, exterior lighting, and other wall penetrations.
An installation that appears minor from outside can involve damaged sheathing or missing flashing underneath. Those conditions should be evaluated before new siding goes on.
Protect Your Home With Experienced Washington Siding Professionals
A small drilling mistake does not automatically mean an entire wall needs replacement. However, widespread cracking, loose panels, or moisture damage can indicate larger problems with the exterior installation.
Builders Service Company specializes in siding replacement and exterior remodeling throughout Washington. We work with vinyl, metal, and our exclusive Evergreen Shield Siding System, helping homeowners choose materials suited to their homes, budgets, and Pacific Northwest weather.
During a free in-home consultation, we inspect the existing exterior, discuss visible concerns, and explain suitable replacement options. When a siding replacement project moves forward, our process includes measuring the home, removing old materials, inspecting the wall underneath, and installing new siding with appropriate trim and flashing.
Why Washington Homeowners Choose Builders Service Company
- Serving Washington homeowners since 1974, with over 50 years of industry experience.
- Locally owned and operated, with founder Mason Ruppel continuing to oversee projects.
- Washington contractor license BUILDSC027JN.
- An A+ Better Business Bureau accreditation reported on the company’s website.
- Experience with vinyl, metal, and the exclusive Evergreen Shield Siding System.
- Customer reviews highlighting installation quality, communication, and attention to detail.
Our goal is to help homeowners make informed decisions about their exterior walls and invest in lasting improvements.
Keep Your Home Exterior Protected
Whether you’re planning new exterior fixtures or concerned about damage to existing siding, understanding the condition of your walls is an important first step.
Builders Service Company serves homeowners throughout Washington, including Seattle, Tacoma, Everett, Olympia, Auburn, Bellevue, Kirkland, and surrounding communities.
If you’re considering siding replacement or a larger exterior improvement, schedule a free in-home consultation. We’ll examine your home’s exterior, discuss suitable siding materials, and review project options and pricing with you in person.
Frequently Asked Questions
Can You Drill Into Vinyl Siding for a Security Camera?
Yes, provided the camera’s mounting system is secured to suitable structural backing and weatherproofed correctly.
A properly installed mounting block helps support the camera without placing its weight directly on the siding panel.
Can You Screw Directly Into Vinyl Siding?
You should not depend on the vinyl panel itself to hold a screw-supported fixture.
The fastener should reach approved backing, and the installation must preserve the panel’s normal movement.
What Is the Best Drill Bit for Vinyl Siding?
A sharp, appropriately sized standard twist drill bit is commonly suitable for making small openings.
Choose the specific bit based on the manufacturer’s instructions and the material behind the panel.
Can You Hang Decorations Without Drilling?
Yes, compatible siding hooks can hold certain lightweight decorations without permanent holes.
Always check the hook’s load rating and make sure it fits the profile of your existing siding.
Will Drilling Into Vinyl Siding Void Its Warranty?
It may affect warranty coverage if the drilling causes damage or violates the manufacturer’s installation requirements.
Review your specific product warranty before modifying installed panels.
Can You Replace One Damaged Vinyl Siding Panel?
Yes, individual panels can often be replaced when compatible replacement materials are available.
Matching the existing profile and color may be difficult with older products, so the condition of the surrounding wall should also be considered.